How to Get Approval for Google AdSense
Are you looking to monetize your website or blog and want to get approval for Google AdSense? If so, you’ve come to the right place! In this blog post, we will walk you through the steps of applying for Google AdSense and provide some tips and tricks on how to increase your chances of getting approved. So let’s get started!
Check if your site is eligible
The first step to getting approval for Google AdSense is to make sure your site is eligible. There are a few criteria your website must meet to be eligible for AdSense. Your website must have original content that complies with the AdSense policies, and it must be easily navigable. Additionally, your site should not contain any illegal content or content that is deemed offensive by Google.
Before applying for an AdSense account, you should also review Google’s Program Policies to make sure your site is compliant. You can find the Program Policies on Google’s website. Additionally, make sure your site is compliant with any applicable laws and regulations.
If you meet all of the above criteria, your website is likely eligible for Google AdSense. Once you’ve verified that your website is eligible, you can move on to the next step: choosing where to show your ads.
Sign up for an account
Creating an account with Google AdSense is easy. You’ll need to provide some basic information about your website, such as its URL and language. You’ll also be asked to provide your contact information and create a password.
Once you’ve submitted this information, you’ll receive an email with a confirmation code. You’ll need to use the code to confirm your account. After you do that, you’re ready to create your ad!
Google AdSense will also ask you a few questions about yourself and your website to help customize the ads it serves. For example, it may ask if you prefer text ads or image ads, or if you’d like to target a specific audience. This helps Google AdSense determine what type of ads are best suited for your website. Answering these questions can help increase the chances of getting your ad approved.
Choose where to show your ads
When applying for Google AdSense, one of the most important steps is deciding where to show your ads. Your ad placements are an essential part of ensuring your success and ad performance.
Choosing the right ad placement is critical because it affects the visibility of your ads as well as their click-through rate (CTR). There are several options available when it comes to ad placement. Here are a few to consider:
1. Above the fold:
This refers to the part of your website that appears on the screen without having to scroll down. Ads placed above the fold tend to be more visible and have higher CTRs.
2. In the sidebar:
Sidebar placements can be effective for increasing visibility and engagement, especially if you’re targeting a specific type of reader or interest.
3. Below the content:
Placing ads below the content can be beneficial because they are less intrusive and don’t interfere with the user experience. However, they may not get as much attention as ads placed higher up.
4. Pop-ups:
Pop-up ads can be a great way to grab attention and increase CTRs. However, they can also be annoying and disruptive to users, so use them sparingly.
5. Native Ads:
Native ads are designed to blend in with your website and look like regular content. They are effective for increasing engagement and driving clicks, but they should not be too intrusive or disruptive.
When choosing where to place your ads, it’s important to consider both visibility and user experience. Experiment with different placements to find the ones that work best for your website.
Create your ad
Creating your ad for Google AdSense is the most important part of the approval process. Your ad should be well-designed, relevant to your website and content, and adhere to Google’s policies.
To get started, sign in to your AdSense account and click on the “My Ads” tab. Then, click on the “+New ad unit” button. You will be asked to choose an ad format, size, and type. Choose one that suits the content and layout of your website.
After you have chosen your format, size, and type, you can start designing your ad. Start by adding a title, description, and display URL for your ad. You can also add custom images or other visuals.
When you are happy with how your ad looks, click the “Save and get code” button to generate the HTML code for your ad. Copy this code and paste it into your website or blog so Google can track the performance of your ad.
Once you are done creating your ad, you are ready to submit it for approval. Make sure to review your ad carefully before submitting it. If there are any issues with your ad, such as spelling mistakes or incorrect formatting, you should fix them before submitting.
Review your ad before submitting
Before you submit your application for Google AdSense, it is important to review your ad carefully. Make sure that all of the information that you provide is accurate and up to date. Additionally, make sure that your ads follow the guidelines established by Google AdSense. If your ad does not meet these standards, then it will likely be rejected.
To review your ad, first, check if your website or blog is eligible for Google AdSense. You must have a content-rich website or blog with original content to be approved. If your website or blog doesn’t meet these requirements, consider making changes to your content before submitting your application.
You should also check the placement of the ads on your website or blog to make sure they look good and fit in with the overall design of the site. Additionally, make sure that your ads are placed prominently and in a place where visitors to your site can easily see them.
Finally, check the content of the ads themselves. Your ads should be relevant to your content and audience, so make sure that they are targeted appropriately. Additionally, ensure that your ads don’t contain any inappropriate or offensive material.
By reviewing your ad before submitting it for Google AdSense approval, you can increase your chances of getting approved. Make sure that your website or blog is eligible, place your ads in an appropriate spot, and double-check the content of the ads to make sure that they are appropriate and relevant. Once you have reviewed your ad, you can confidently submit your application for Google AdSense approval.
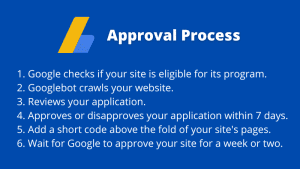
Wait for approval
Once you have created your ad and clicked submit, it is now time to wait for Google AdSense to review your application. It usually takes a few days, though sometimes it can take up to two weeks. Once approved, you will receive a confirmation email with further instructions on how to set up your ads and start earning money.
It’s important to note that Google AdSense can reject applications for various reasons. If this happens, you’ll be sent an email with an explanation of why your application was rejected. If possible, try to identify the issue and resolve it before reapplying. You may need to make changes to your website or ad content or adjust your payment settings.
If you are not sure why your application was rejected, you can contact the AdSense team for more information. They’ll be able to provide specific advice on what needs to be changed for your application to be approved.
Keep in mind that getting approved by Google AdSense isn’t always easy. It can be a lengthy process that requires patience and attention to detail. However, if you keep working at it and follow their guidelines, you should eventually get approved. Good luck!